I’ll admit it … I’m a latte girl
[and I use poetic licence with the word *girl*] … haha
Some of my friends [who shall remain nameless … you know who you are!] think I’m a coffee SNOB.
Well … maybe I am … I love the thick creamy texture, the taste of good espresso, milk and latte froth. If I taste a coffee I don’t like, I certainly won’t drink it … why would I?
If that makes me a snob, so be it … some cafes don’t realise they are not cleaning their espresso machines correctly, or that they are using a half shot of coffee which makes the latte taste weak and weasely.
I’m going to share with you how I make latte in my kitchen. Of course this will vary from how it’s made in a cafe, but I thought it might be nice to see how it’s done at home.
Ready?
You need a stove, a coffee espresso maker of some description, a milk-frother, fresh coffee grounds, full cream milk, and your favourite coffee cup or glass [I’ll use a glass so you can see how much coffee and milk I use].
The whole process takes less than 10 minutes
Some of my friends can’t understand why I’d bother to make my own latte, as they say it, “takes too long”. Well, either they’ve never tried, or they’re guessing!
It takes 10 minutes or less, and is well worth the effort.
Ok, let’s get started!
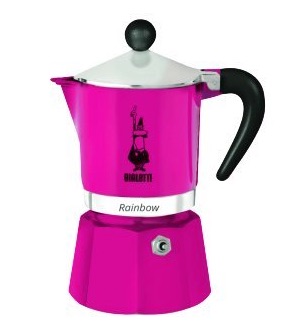
1 : My Bialetti Coffee Pot 1 : My Bialetti Coffee Pot
This photo is of a shiny new coffee pot – mine is about 20 years old and has travelled the world with me. It’s the last thing in my suitcase and the first thing out! I’ve lived in quite a few other countries, and even take it with me on some holidays. Mine looks pretty beaten up, and well used, but the FLAVOUR! Mama mia, delicioso! Do I ever use coffee machines? Sure – but I don’t own one. I’m so happy with the results of this old old Italian technique for making coffee, I haven’t found the need to buy a machine … yet. :o) I believe mine is what’s called a “3 cup” coffee pot, but it makes enough for me for a coffee mug full of latte. [PS I also have larger Bialetti pots for when visitors come over.]
2 : A Latte glass or cup 2 : A Latte glass or cup
Next I get my coffee cup out, or my latte glass, whichever takes my fancy.
3 : Full cream milk
Yes, I use full cream milk. I’ll be honest, I’ve tried skim and low fat milk, and for me the taste is just that little bit less than what I was expecting. Having said that, when frothed with my milk frother, the thickness of the hot milk is the same, so it’s up to your personal taste.
4 : Milk saucepan 4 : Milk saucepan
Before you ask, no, I don’t own a microwave, but yes you can heat the milk in one. I prefer to use the stove, with a milk saucepan, which is teflon coated [non stick], and has a pouring “lip”.
5 : Milk Plunger 5 : Milk Plunger
This is the secret ingredient in this whole “recipe”! These wonderful little objects cost around $6.99 [in Target and KMart in Australia] and I have bought quite a few of them for my coffee-drinking friends. Remember those little battery operated “milk frothers”? Useless – never found one which worked. But these little puppies – work like a charm every single time, creating the best thickened frothy milk imaginable!
6 : A stove … of course 6 : A stove … of course
That’s right, I make the coffee and heat the milk on a stove. Whether you live in a house, apartment, campervan or a tent, you can get by with a one-burner stove. You can even go to camping goods stores and buy a one-burner gas/gaz stove, or in Target or other budget homewares stores you will be able to find a one-burner / one-element / one-ring stove which you can plug in to the electricity.
How I make my latte
Here are the steps I take – feel free to tweak them or change them to suit yourself:
* Pour cold milk into your cup or glass, somewhere between one third and one half full
* Pour the milk from the cup or glass into the saucepan
* Put the saucepan on the stove, low heat
* Open the coffee pot – there are 3 parts, bottom [where the water goes], middle [where the ground coffee goes] and top [where the resulting hot coffee appears]
* Pour cold water, or tap/fawcett water into the bottom section, up to the little steam release opening in the side
* Insert the middle section over the water-filled bottom section
* Pour coffee grounds in, up to the top – some people press this down – I don’t – it’s up to you. Just remember, this will make strong espresso. Use less coffee if you find this is too strong.
* Screw the top section of the coffee pot on, being careful not to tilt too far because of the water
* Make sure it is screwed on tight, then place on the stove top
* By now your milk might be close to being ready – you’ll see bubbles forming on the top of the milk in the saucepan
* If it’s bubbling rapidly, remove from the heat before it bubbles too much and overflows
* What happens now? The water in the bottom part of the coffee pot starts to boil, and as it does, it is forced upwards through the little funnel inside the pot [which is attached to the middle section]
* As the water gets forced with great pressure, it goes through the ground coffee, and then is forced upwards further still until it reaches the top part of the coffee pot
* When all the water has gone through the middle section and has been flavoured with the coffee grounds, it ends up in the top section of the pot – you can tell it’s ready because the little pot starts to make a gurgling sound
* Remove the pot when you hear this noise, or if it’s a gas stove, turn it off at this point. If you leave the pot on the heat, it will burn and taste awful
* Pour the hot coffee into your waiting glass or mug – it probably fills about one third, maybe a little more
* Pour the hot milk into the MILK FROTHER glass, add the plunger, pump it up and down quickly while keeping firm hold on it sitting on the benchtop. After about ten pumping actions you’ll notice the milk feels “thick” as it’s becoming aerated, and a froth also appears
* The milk looks like it’s doubled in size!
* Remove the plunger part, run it under the tap immediately to remove all the hot milk
* Now – the best bit – slowly pour the milk into the waiting hot coffee in the glass or mug, and pour in as much of the creamy froth as you’d like
* I general stir just once, it doesn’t need it, and if you take sugar you could add that now, or even before you poured the coffee – it’s up to you
* For me this is the best coffee – I use La Vazza [see what I wrote about La Vazza]
* The aroma is wonderful, the coffee is thick and creamy when mixed with the hot fluffy milk, and this is as close as I’ve ever come to making the best coffee at home!
* PS – Don’t forget to fill the milk saucepan with water before you sit down, to make it easier to clean later
If you like this technique, or have a great process of your own, send me a message and I’ll include it on this site.
Enjoy your coffee! Ciao ciao,
Teena!


 Coffee in Paris